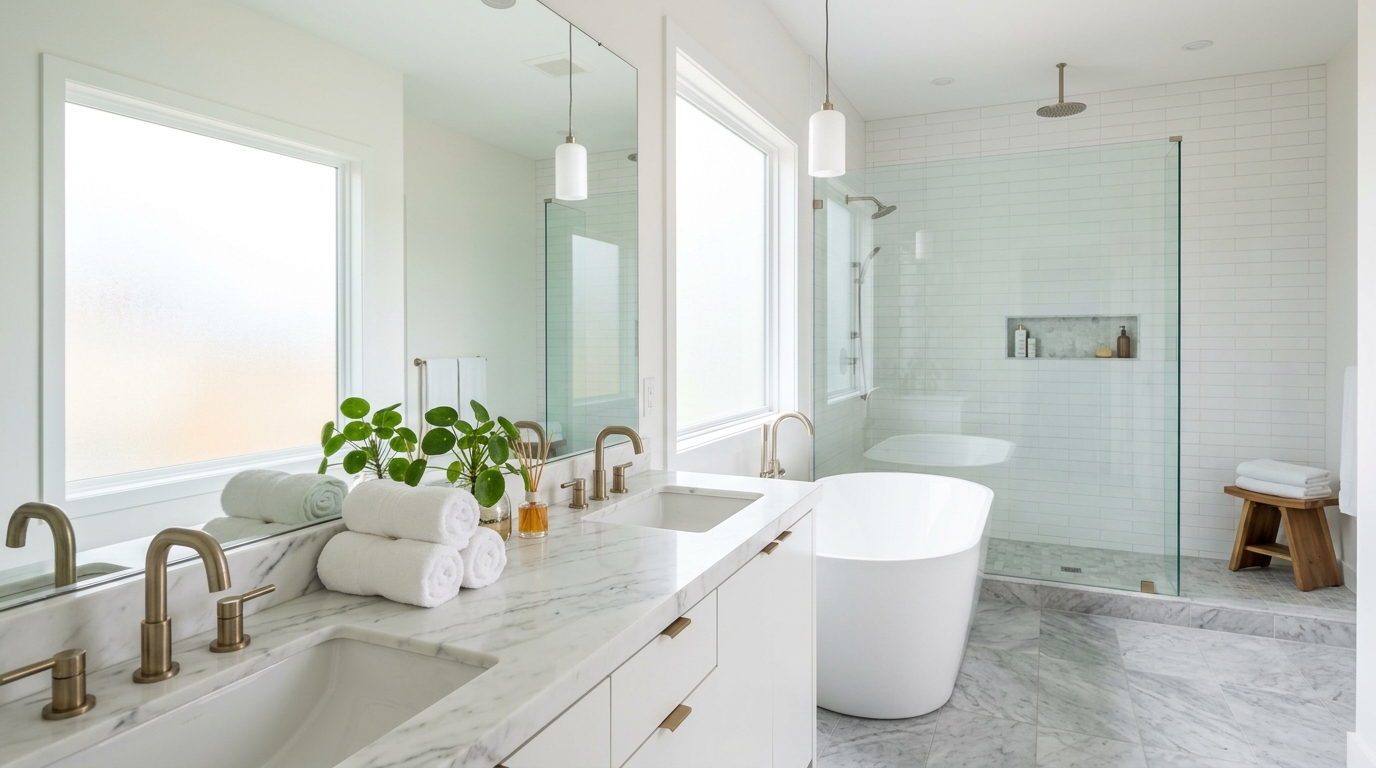
How to Photograph a Bathroom: 7 Pro Tips for Clean and Airy Visuals
Transform cramped, dark bathrooms into spa-like retreats that captivate buyers and sell listings faster.
The Secret to Bathrooms That Sell
Let’s be honest: bathrooms are arguably the most awkward rooms in any house to photograph. You’re dealing with tight quarters, reflective surfaces everywhere, and the ever-present danger of accidentally including yourself in the shot via a poorly placed mirror. Yet, behind the kitchen, the primary bathroom is the most scrutinized room by potential buyers. It’s where they imagine their morning routines and their evening wind-downs. If your photos feel cramped, dark, or—heaven forbid—a little bit grimy, you’re losing leads before they even read the property description.
When you’re learning how to photograph a bathroom, you aren’t just documenting a room with a toilet and a sink; you’re selling a lifestyle. You want the viewer to feel a sense of cleanliness, serenity, and luxury. Whether you’re a DIY-inclined agent or looking to better communicate with your professional photographer, these seven pro tips will help you capture those coveted clean and airy visuals.
1. Master the Art of the "Grand Declutter"
Before you even touch your tripod, you need to strip the room down to its essentials. Bathrooms are magnets for daily clutter that kills the "spa-like" vibe. We’re talking about toothbrushes, half-empty shampoo bottles, bath mats that have seen better days, and the dreaded wastebasket. Even a designer soap dispenser can sometimes look messy if the label is peeling or it’s mismatched with the decor.
Think of it as creating a blank canvas. Remove everything from the countertops except for one or two high-end items (like a glass bottle of perfume or a small succulent). If the bathroom is currently occupied and the sellers have too much gear to move quickly, you might consider using virtual decluttering to clean up the digital version of the space. A clean counter reflects more light and makes the vanity appear larger, which is the first step toward that airy feel.
Pro Tip: The Toilet Seat Rule
It sounds like common sense, but you would be shocked at how many MLS listings feature a wide-open toilet. Always, always close the lid. It’s a small detail that makes a massive difference in the professional feel of the image. While you're at it, ensure the toilet paper roll is full and has a clean, straight edge.
2. Use Smart Angles to Maximize Small Spaces
Most bathrooms are small, and trying to fit a vanity, a tub, and a shower into one frame is a recipe for distortion. The biggest mistake people make is standing in the corner and pointing the camera down. This makes the floor look like it’s swallowing the room and creates a "funhouse" effect with the walls.
Instead, try shooting from a lower perspective. Setting your tripod at roughly waist height or just above the counter level helps keep the vertical lines straight. When vertical lines (like the edges of a shower or the corner of a wall) are perfectly upright, the room feels more stable and spacious. If you find yourself struggling with a particularly tiny powder room, check out our guide on how to photograph small spaces for more advanced composition techniques.
3. Conquer the Mirror Reflection Challenge
Mirrors are the primary enemy of the real estate photographer. They are everywhere in bathrooms, and they love to show things you don't want to see—like your camera, your tripod, or the back of your head. To avoid the "accidental selfie," you need to master the 45-degree angle.
Position your camera so it’s shooting across the vanity rather than directly into it. If you must shoot toward a mirror, try to find an angle where the reflection shows a clean part of the room, like a window or a piece of art on the opposite wall. If you can't avoid being in the reflection, some pros use a remote shutter and stand outside the room, hidden by the door frame. Remember, a clean, streak-free mirror is non-negotiable. Every smudge will be highlighted by your camera’s flash or the natural light from the window.
4. Leverage Natural Light (and Kill the Yellow Glow)
To get that "airy" look, you need light—but not just any light. Standard bathroom bulbs often cast a harsh, yellow, or orange tint that makes even the cleanest tile look dated and dingy. This is known as "mixed lighting," where the cool blue light from a window fights with the warm yellow light from the ceiling fixtures.
The pro secret? Turn off the lights. Seriously. If the bathroom has a window, rely on natural light as much as possible. It provides a soft, even glow that feels modern and fresh. If the room is windowless, you’ll need to use a flash or a high-quality LED panel bounced off the ceiling to mimic natural light. If you must leave the lights on, ensure all the bulbs are the same "color temperature" (all daylight or all soft white) to avoid weird color patches in your photos. This creates the emotional visual triggers that tell a buyer the home is well-maintained and modern.
5. Stage for the "Five-Star Spa" Vibe
Once the clutter is gone, you need to add back a few intentional elements that suggest luxury. This is where lifestyle staging comes into play. You aren't just showing a room; you're showing a retreat.
- White Towels Only: There is a reason high-end hotels use white towels. They look clean, fresh, and expensive. Use thick, fluffy white towels, perfectly folded or rolled on the counter or a stool.
- Natural Elements: A small vase with a single green leaf or a small potted orchid adds a pop of life to an otherwise sterile environment of tile and porcelain.
- High-End Toiletries: A glass bottle of high-quality hand soap or a wooden bath tray with a book and a candle can make a bathtub look like a sanctuary.
These small additions help the buyer visualize themselves relaxing in the space, which is a powerful psychological tool in real estate marketing.
6. Focus on Textures and Details
While wide-angle shots are necessary to show the layout, don't forget the detail shots. Buyers love to see the finishes. If the home has a high-end rain shower head, a unique backsplash, or custom cabinetry, zoom in on it. These "vignette" shots add variety to your listing and give it a high-end, editorial feel.
Make sure the chrome is polished to a mirror finish and that the grout looks white. If the grout is stained, it might be worth a quick cleaning before the shoot. High-resolution photos are unforgiving; they will show every water spot on a glass shower door. A quick wipe-down with a microfiber cloth right before you click the shutter can save you hours of editing later.
7. Post-Processing: The Final Polish
Even the best raw photo needs a little love in post-production. To achieve that airy look, you’ll want to slightly boost the exposure and shadows. This brightens the dark corners and makes the whole room feel more open. However, be careful not to "blow out" the highlights—you still want to see the texture in the white tiles and the detail in the porcelain sink.
Color correction is also vital. If your white tiles look slightly blue or yellow, use the white balance tool to make them a true, crisp white. This single step can take a photo from "amateur" to "architectural magazine quality" in seconds. If the view out the bathroom window is particularly stunning—perhaps a garden or a skyline—you might need to use an HDR (High Dynamic Range) technique to ensure both the interior and the exterior view are perfectly exposed.
The Bottom Line
Learning how to photograph a bathroom is about balancing technical skill with a designer's eye. By focusing on straight lines, clean surfaces, and soft, natural light, you can turn a functional room into a major selling point for your listing. These visuals don't just help the property sell; they build your brand as an agent who pays attention to the details and presents every home in its absolute best light.
Ready to take your listing marketing to the next level? From professional photography to immersive tours, The Listing Showcase is here to help you stand out in a crowded market. Start implementing these tips today, and watch your engagement soar!