How to Photograph Small Spaces: Tips to Make Rooms Look Big
Master the art of perspective and lighting to transform cramped quarters into spacious listing photos.
The 'Shoebox' Challenge: Why Small Space Photography Matters
We’ve all been there. You walk into a listing that looks great on paper, but once you step inside the 'bonus room' or the third bedroom, it feels more like a walk-in closet than a living space. As an agent, your heart sinks a little because you know the camera usually makes small rooms look even smaller. But here’s the secret: with the right techniques, you can turn that cramped 'shoebox' into a spacious, airy retreat that captures a buyer's imagination.
In the world of real estate, perception is reality. If a buyer scrolls through Zillow and sees a dark, cramped bathroom, they’ve already mentally moved on to the next house. However, if that same bathroom looks bright and functional, you’ve kept them on the hook. Mastering how to photograph small spaces isn’t about being deceptive; it’s about accurately conveying the potential of every square inch. Let’s dive into the visual strategies that will make your smallest rooms look like your biggest selling points.
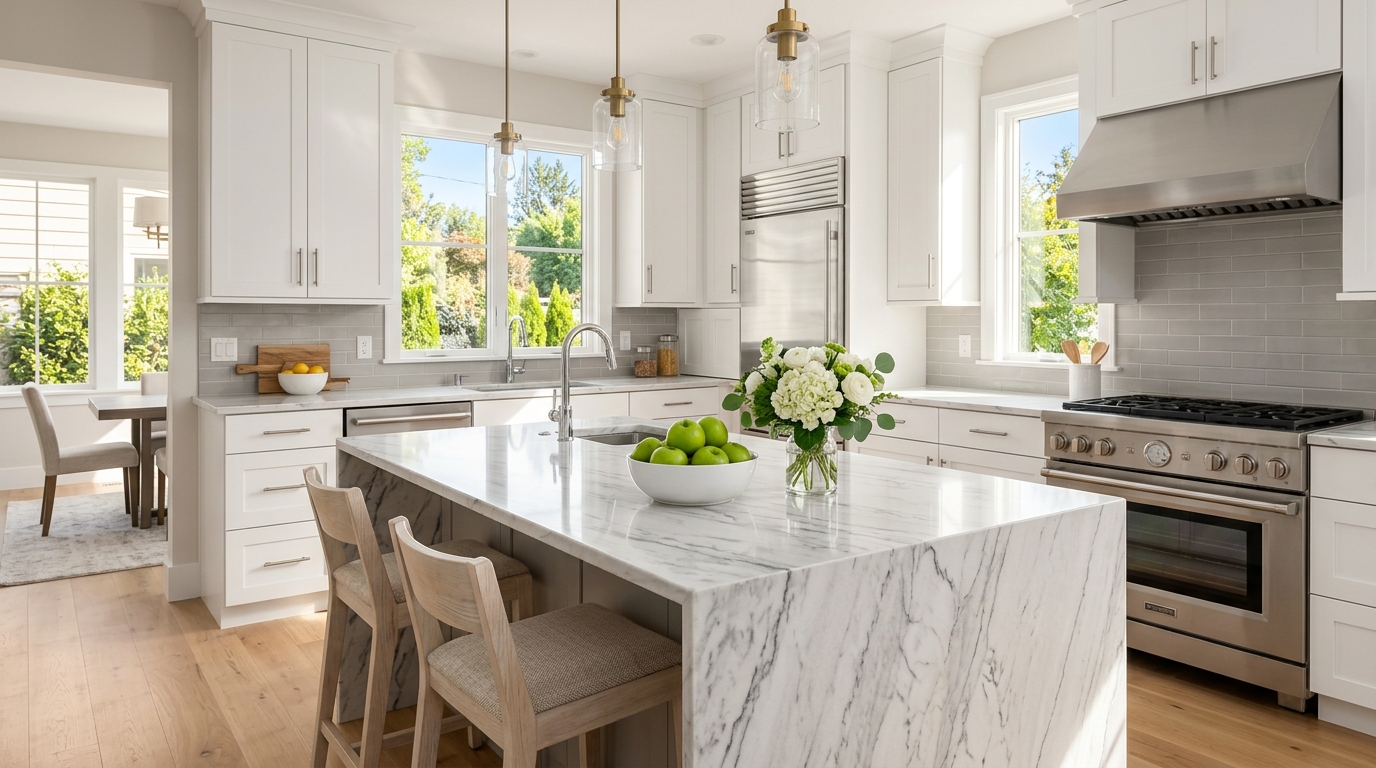
1. The Secret Weapon: Choosing the Right Lens
If you’re trying to photograph a small space with a standard smartphone lens or a 50mm 'portrait' lens, you’re fighting an uphill battle. To make a room look big, you need a wide-angle lens—but there’s a catch. If you go too wide, you end up with the 'fish-eye' effect where walls look like they’re bending, which can feel untrustworthy to savvy buyers.
The 'Sweet Spot' Focal Length
For most interior real estate photography, a focal length between 16mm and 24mm (on a full-frame camera) is the goldilocks zone. It’s wide enough to capture three walls in a single frame—giving the viewer a sense of the room's depth—without distorting the furniture so much that a coffee table looks like a surfboard. If you're using a phone, ensure you're using the '0.5x' setting but be careful to keep the phone perfectly level to avoid vertical distortion.
For more foundational advice on equipment and general techniques, check out our guide on 10 real estate photography tips that sell homes faster.
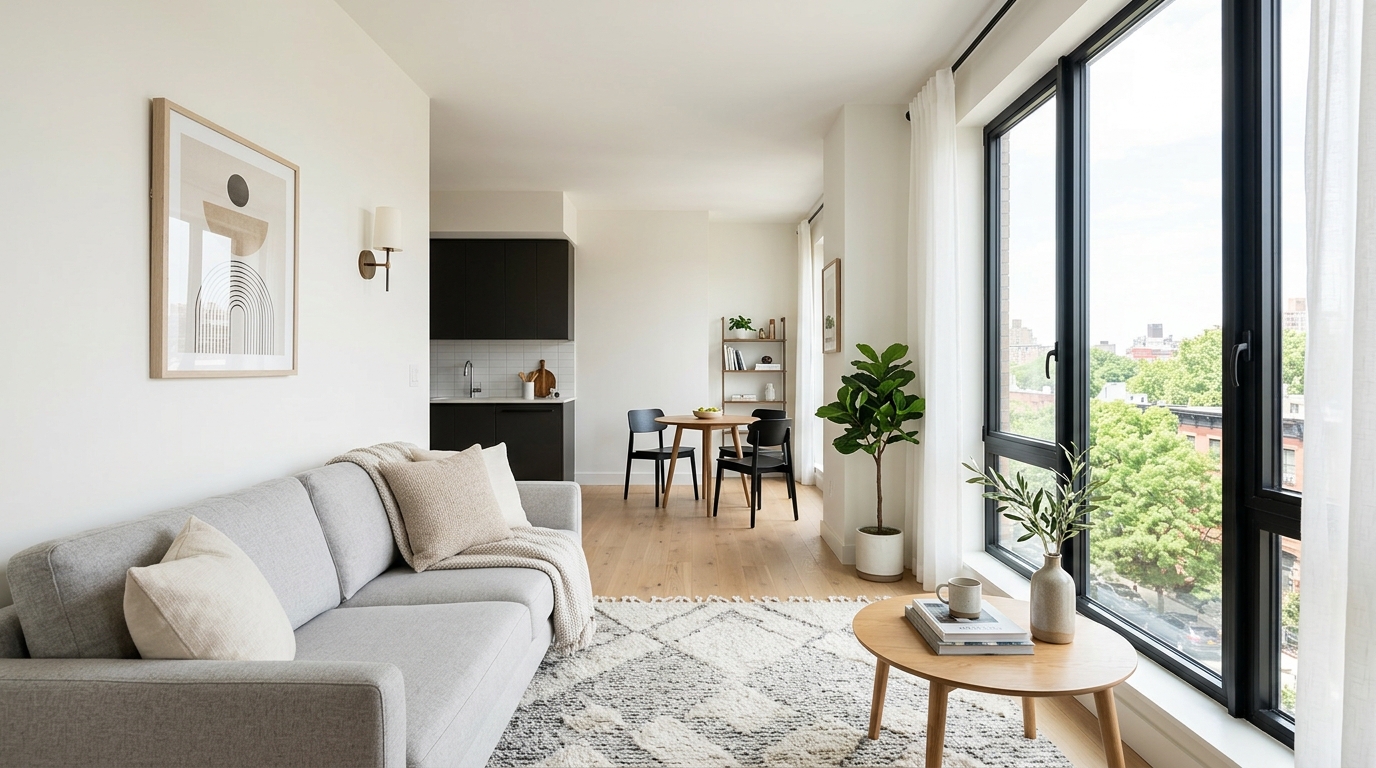
2. Shoot from the Corner (and Shoot Low)
Angle is everything when you're working with limited square footage. The biggest mistake rookies make is standing in the doorway and shooting straight ahead. This flattens the room and makes it look like a box. Instead, tuck yourself (and your tripod) as far into a corner as possible.
The Power of the Corner Shot
By shooting from a corner, you utilize the longest diagonal line in the room. This creates a sense of depth and leads the eye across the space, making it feel significantly larger. Additionally, try lowering your camera height. While we usually see the world from eye level (about 5-6 feet), shooting interiors from chest height (around 3-4 feet) shows more of the floor. In the human brain, more visible floor space equals more square footage.
3. Lighting Hacks to 'Push' the Walls Out
Darkness is the enemy of space. Shadows create 'visual weight' that makes walls feel like they’re closing in. To combat this, you need to flood the room with light, but you have to be smart about it.
- Natural Light is King: Open every blind and curtain. If there’s a window, make it a focal point. Natural light blurs the boundaries between inside and outside, which trick the eye into thinking the room extends further.
- Turn on the Lights: While some pros prefer 'pure' natural light, in small spaces, turning on lamps and overhead lights can fill in those pesky dark corners.
- Avoid 'Blown Out' Windows: One of the hardest parts of photographing small rooms is when the window is so bright it looks like a white blob. Using HDR (High Dynamic Range) techniques or 'flambient' (flash + ambient) photography allows you to see the view outside the window, which adds even more perceived depth to the room.
4. Staging for the Camera, Not for Living
A room that is perfectly functional for daily life is often too cluttered for a photo. In a small space, every object 'eats' visual air. If you have a small bedroom with two nightstands, a dresser, and a chair, it might be time to move the chair and one nightstand out of the frame.
Sometimes, the problem isn't just a few extra chairs—it's a lifetime of 'stuff.' If you're dealing with a particularly crowded home, you might want to look into how to use virtual decluttering to sell messy listings. It’s a game-changer for showing the true bones of a small room without asking the seller to rent a storage unit before the photoshoot.
The 'One-Third' Rule
Try to ensure that at least one-third of the floor space is visible and unobstructed. This creates a 'walkable' path for the viewer’s eye, making the room feel accessible rather than cramped.
5. Vertical Lines: The Realtor’s Best Friend
Nothing screams 'amateur' like leaning walls. When you tilt your camera up or down to try and fit more of the room in, the vertical lines (corners, door frames, window edges) start to converge. This makes the room feel like it's collapsing on itself.
Keep your camera perfectly level. Use a tripod with a built-in level or turn on the 'grid' feature on your smartphone. When the vertical lines are straight, the room looks stable, professional, and—most importantly—more expansive. If you can't get everything in the frame while keeping the camera level, it's better to crop a bit of the ceiling than to tilt the camera and ruin the perspective.
6. Use Professional Floor Plans to Provide Context
Sometimes, even the best photo can't fully explain how a small room fits into the larger house. A buyer might see a photo of a small office and wonder, 'Wait, is that right next to the kitchen or off the master?'
This is where visual aids become essential. When you use professional floor plans to win more listing leads, you give buyers a map to accompany your photos. They can see the dimensions and understand that while the room is cozy, it’s perfectly placed for a nursery or a home office. It removes the 'mystery' of small spaces and builds trust.
7. The 'Vanishing Point' Technique
In art, the vanishing point is where parallel lines appear to meet in the distance. You can use this in real estate photography by framing your shot so that the lines of the floorboards, the ceiling, or even a rug lead toward a single point in the distance (like a window or a doorway). This creates a 'tunnel' of space that draws the viewer into the image, making the room feel like it goes on forever.
Quick Checklist for Small Space Photoshoots:
- Clear the surfaces: Remove everything from kitchen counters or bathroom vanities.
- Pull furniture away from walls: Even an inch or two of space between a sofa and a wall creates 'breathing room.'
- Use mirrors: If the room has a mirror, position yourself so you don't appear in it, but use its reflection to show the other side of the room.
- Check the 'dead space': Don't take a photo of just a bed; make sure you show the space around the bed.
The Bottom Line: Quality Over Quantity
When it comes to small spaces, you don't need twenty photos of the same room. You need two or three incredible shots that highlight the light, the floor space, and the functionality. By using a wide-angle lens correctly, shooting from the right height, and ensuring your lighting is on point, you can transform a property's perceived value. Remember, your job is to get the buyer through the front door. Once they're there, they'll fall in love with the charm—but it's your photos that get them to book the showing in the first place.
Ready to take your listing presentation to the next level? At The Listing Showcase, we specialize in making every home—no matter the size—look like a masterpiece. Start applying these tips today and watch your engagement soar!